In this article, we will be discussing how to create a hypertufa container. In a previous article on stone containers I discussed hypertufa and how it can be used to make containers, I barely touched the subject in that article but now it is the time to discuss how to do it properly.
As said in that article stone containers are delightful in the garden but they are expensive, it is easy to make a fake stone mixture that can be used to mould your own container; it is called hypertufa.
It can be used to cover an old Belfast sink to give it a more aged look. To do this the shiny surface of the sink will have to be sanded to create a rough surface and then covered with a good outdoor bonding adhesive. As the glue dries it forms a rough surface to which the hypertufa can stick to. If the surface is not rough enough the mixture will simply slide off.
YOU CAN GO FREESTYLE OR FORMAL
You have two options when making hypertufa containers- formally or free-syle. If you want to create a free-style hypertufa container then you need to create a mould. The mould needs to be made out of scrunched up small-mesh chicken wire.
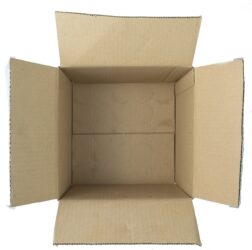
You make them to any shape that you want and then pour the hypertufa mixture inside to set. This can be a little haphazard and can easily go wrong. This is why the preferred option is to use the formal method, which will be described in this article. This method relies on the use of readily available cardboard boxes but you can use plastic containers as long as you spray them with cooking oil to enable it to be released easily. This will either create a stone sink or trough.
Hypertufa takes a long time to set and totally dry out, so it is best to make the container in-situ, as it will easily break if you move it. Alternatively, you can place the container on a firm wooden base that you can easily lift without the sides needing to be touched.
The problem is that the hypertufa continues to dry even when the mould is removed. The way to test when the hypertufa is completely dry is to observe it to see when it turns a pale grey colour. If the grey colour is very similar to stone and the texture is rough to the touch and it feels dry, then it is probably dry.
It is best to leave hypertufa containers outside in the open for long as possible. This will give it a more weathered and stone-like appearance. To speed up the ageing process you can paint the outside of the container with yoghurt as this will encourage lichens and mosses to colonize the outside of the container. This will give it an ancient look, instead of an artificial, new look. You can transform any outdoor container into a stone one, just by giving it a coating of hypertufa.
HOW TO MAKE A FORMAL HYPERTUFA CONTAINER
First, select two strong, cardboard boxed that will fit one inside the other. The gap between them must be at least 5cm all the way around. The outer box height will be the depth of the finished container. Make sure all boxes have no holes in them and are secure and will not collapse. It helps if the inner box is taller so that a small amount of the inner box protrudes over the outer box.
Cut a piece of chipboard (available from DIY stores) to fit exactly inside the base of the larger outer box. Buy 4 wood corks and then nail them to the chipboard. These will form the drainage holes in the base of the container. The corks should be placed at a fixed distance from the centre of the chipboard so that all four corks are at equidistance from the central point.
Cut a piece of fine mesh chicken wire and then cover the base of the inner box completely on the outside and not the inside. Fold the corners down to form a large cage that is only slightly bigger than the inner box. This wire will prevent the inner box from rotting and collapsing.
Place the small, inner box with the reinforced wire cover into the large box to check for snugness of fit. If the wire protrudes too much, you can bend it down until a snug fit is created.
Next, you will need to make the hypertufa mixture. This is made by mixing equal parts by volume of Builder’s cement, coarse gritty, builder sand (No other sand will do) and multipurpose compost, This is mixed with enough water to form a sloppy, wet paste and not a slurry.
Remove the inner box with the wire mesh around it and trowel enough of the hypertufa mixture to cover the base to the level just above the top of the corks. Make sure that the corks are never covered as this will prevent them from becoming drainage holes. It is best filled by the use of a pointing trowel.
Now fit the inner box and wire mesh frame at an equidistance from the inner perimeter of the outer box. The distance between the inner box and the outer box should be the same all the way around. Make sure, it is pressed down firmly, so that the box sinks into the hypertufa. The gap between the inner box and the outer box should be filled with more hypertufa. Fill up to the level of the outer box and no higher.
Use a wooden stick and firm the mixture well down between the two boxes on every side of the mesh, so that any air pockets can be displaced. If not this would turn in holes in the side of the container and the container will not be strong. Do not worry if the sides of the box bows ever so slightly, as it will give a more pleasing shape. Any gaps should be filled with more hypertufa.
Finish off the hypertufa by roughly rounding and smoothing the exposed surface by using a pointed trowel. You now have to wait for the mixture to dry.
HOW TO REMOVE THE MOULD FROM THE CONTAINER
After six weeks for a large sink or troughs, it is time to remove the cardboard boxes.
First, remove the inner cardboard box by folding it inwards then lifting out the base one at a time. Be slow and be careful as any force can damage all the hard work you have done.
Carefully peel away the cardboard from the sides of the container. Carefully remove it as you do not want to damage the outer shell of the container. Any cardboard shreds that remain can be loosed and removed by using your fingers.

To remove thin paper slivers, wet them and peel them off with a knife, or if you are more confident you can try wire brushing. This will give a better outside texture.
Turn the container over to lever away the chipboard from the base of the container. The corks will be left but the board should come away easily.
Drill through the corks to make the drainage holes in the base. This is much safer than trying to drill holes into the hypertufa, which will easily crumble and split. Use a 12mm drill bit to do this.
The container will now have good drainage holes for its size something that old ceramic sinks did not have. Let it dry further until it changes to a pale grey colour. When it is in its final position place it in on bricks to allow any excess water to drain away.
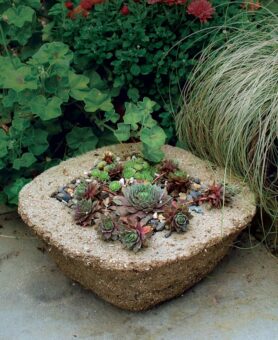
The hypertufa planter can now be used and is ideal for alpine and rock plants. You have now finished the process.
CONCLUSIONS
In this article, we have discussed how to make your own hypertufa container, a container that has a stone effect but at a fraction of the cost. They are not difficult to do all you need is compost, cement, building sand, some chipboard, 2 cardboard boxes, a trowel and time. The mixture is very easy to make, as long as you make a paste and not a slurry. Hypertufa containers are versatile and can be used to house your plants in,
If you want to create your own container cheaply and have a stone effect then this is a project for you.
If you have any questions or comments to make on this subject, please do so in the comment box below.
Happy hypertufa container making.