
In this article, we will discover how to create a versatile window box. We all know that window boxes will be on show all the time and if they do not look their best, it can easily spoil the display. How do you avoid this, which will be answered in this article?
Often window boxes will use temporary plants that need to be replaced often, so instead of actually planting the specimens in, it will be better to fill the box with a growing media and plunge the pots up to the rim in them. This is better than constantly taking the plant out, adding new growing media and then replanting.
This is such a versatile scheme as individual plants can be replaced without disturbing the others. In this way, window box planting schemes can be changed quite dramatically, easily and quickly throughout the year as the seasons’ change.
It may be advised to have a permanent wreath of foliage in front to hide the harsh edges of the box. Plants like trailing ivy will accomplish this task.
The centre of the window box should be left where the plants can be changed when it needs to be.
YOU CAN MAKE A SPRING OR AUTUMN DISPLAY
For spring, spring bulbs and polyanthus can be used to give an instant splash of colour (see how to create a window box with an instant spring display on how to do this). Once spring has come to an end, you can replace them with bedding annuals, Fuchsias, pelargoniums or even a mixture of culinary and scented herbs in summer.
For displays from autumn until spring, the best plants to use are colourful plants like winter-flowering pansies, heathers, or colourful ornamental cabbages. Mixed these with other foliage plants such as ivies or euonymus.
In towns and cities, the microclimates are often enough to allow some of the hardier indoor plants to be used, such as cyclamens and azaleas to be grown in a sheltered spot under a window.
To do this, have a good nosy around to see if others in your local area have had much success with this approach.
WHAT PLANTS CAN BE USED?
As said previously, foliage plants are one of the mainstays of the window box scene, but you are not limited to using ivy in their own pots, This is advised to do as you can replace them when it became necessary. Plants to use include small conifers that are upright in growth and even leafy houseplants such as asparagus ferns.

Other plants that you can consider is Campanula carpatica, Double primroses, Lavenders, Polyanthus, bulbs of any kind, Ranunculus, rockery plants, herbs like rosemary and thyme, Sanotinas, pelargoniums, Swan River Daises and Ageratum.
Whatever plant you use, you will need to regularly feed and water the compost the pots are placed in. Make sure it is fed and watered thoroughly so that the compost in the pots and the growing media that surrounds it are moist to the plants’ preference.
This will ensure that the air is humidity around the plants and that it will help to keep them in good conditions.
Check the window boxes every few days since they tend to be at higher elevations and therefore more likely to dry quicker, especially when it is windy and sunny at the same time.
If you let the compost dry out too often this will seriously affect the flowering and leaves will start to turn brown. You need to be on top of your game.
CREATING A VERSATILE WINDOW BOX
First, you will need to create a wooden window box as highlighted in my article in creating such a wooden box. In this design presented here, it is better to use outdoor wood varnish to give a more reliable and natural look.

Inside the wooden window box place a rigid plastic trough as demonstrated in the same article. This will prevent the wood from rotting and it will hold the growing media and plants securely. There is no need to drill drainage holes at the bottom, as it is not required.
To get the overall feel of the theme that you will be using, you will need to arrange the plants in front of the window box and play with them. Once you have come up with a satisfactory design, place 2.5cm of multipurpose compost in the trough to this depth. Make a small depression for where you want each pot to lie in.
BE HAPPY BEFORE YOU PLANT OUT
Once you are happy, place the plants still in their pots into the trough. You have a choice of going symmetrical or asymmetrical.
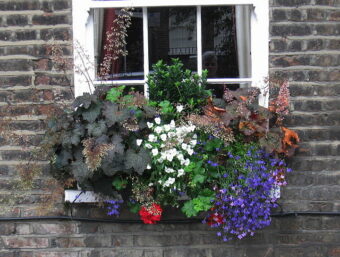
The one demonstrated here is a symmetrical display in which at each corner, two trailing ivies are used so that the stems and leaves cascade over the side.
The flowering plants are grouped in the centre. Plants like 2 swan river daisies planted on the right of the left trailing ivy. Next to that plant 2 Pelargoniums and next to that 2 Ageratums. The display should mirror each other if a symmetrical line is placed at the centre. It may be simple but it looks stunning.
Fill the space between the pots with more compost, right up to the rim of the pot. This will keep the pots in place and help moisture to be reserved when the plants need it.
Once plants fade and look well beyond their best, you can replace them with new plants. This is a great time to experiment more and come up with a new look.
HOW TO RING THE CHANGES
If you want to alter the design described above is to lift out some plants and use alternatives. One such alternative is to lift out the swan river daisies and two ageratums from the centre of the display and replace it with a tuberous begonia and notice how the display looks. You have so many possible combinations and the only limit is your imagination.
CREATING HOUSEPLANT WINDOW BOX FOR MILD AREA
In locations that are mils such as city centres, some of the hardier houseplants that can thrive outdoors in a sheltered window box can be used. Plunging then in a box filled with multipurpose compost will provide some protection from the cold.

As ever, first, make your wooden window box cover to your own preference and own paint colour schemes. Place a trough in it and drill some drainage holes at the bottom of it. Cover the drainage holes at the base by using broken crocks and then add a layer of coarse gravel to allow rainwater to drain through quickly without waterlogging the plants.
Place the most striking plant in the centre (In this case, a colourful Chrysanthemum will be used). Add more gravel and multipurpose mixture to bring the edge of the pot to just below the rim of the window box, so that the pot is just out of sight.
For a symmetrical display, place a pair of winter cherry plants one at each end in the window box. Place each plant so the best side faces the front and can be observed from every possible angle and the branches are allowed to trail over the frame.
Fill the gaps between the pots with more gritty multipurpose compost and top off with a 2.5cm layer of gravel. This will add attraction to the display and will add extra drainage, which is vital in winter.
Your houseplant window box display is now complete,
CONCLUSIONS
In this article, we have discussed how to create a versatile window box where the box can be decorated to your own preference and filled with plants in their own pots.
The choice of what can be used is endless and plants that can be used to accomplish this has been disclosed. The window boxes must be versatile, easy to change depending on what season it is and what mood you are in.
If you do not like a plant, simply remove it with the pot and replace it with another, as simple as that.
You can even use hardy houseplants to give a more unique display in winter.
If you want to create a versatile window box display then if you follow what I recommend, you cannot go wrong.
If you have any questions or comments about creating versatile window boxes, please do so in the commend box below.
Happy versatile window box creating.