In this article, we will discuss how to grow the distinctive shrub of Phlomis in containers. Phlomis is a relatively large genus of 100 species of herbaceous perennials, subshrubs and shrubs belonging to the Lamiaceae (the mint or Sage or Deadnettle) family. It is a plant that is native to areas of the Mediterranean, Central Asia and China.

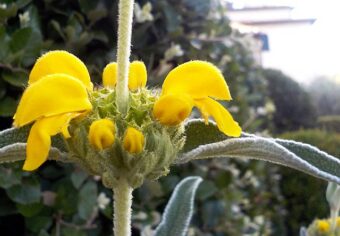
The name is derived from the Greek word meaning ‘Flame’. The shrub is grown for its distinctive foliage as well as the attractive blooms it produces. The 30cm to 2m tall shrub is comprised of green-grey leaves that are opposite, with each leaf pair at right angles to the next. The leaves are also heavily veined. The stems are usually square in cross-section with rounded corners and are covered with dense woolly hairs.
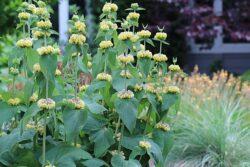
In summer to early autumn the yellow to pink stalkless hooded blooms appear and are borne in whorls along the upper leaf axils of the stems. They make a useful addition to the UK garden, where their greyish-green leaves often make a great contrast to other grey leaf plants you may have. After flowering, the dead flower heads often give a structural appearance to the garden.
The biggest drawbacks are that with age it can become leggy and flops all over the place and that it is not fully winter hardy, as cold, wet winters can kill them. Phlomis hate too much moisture at the roots.
Find out how to grow Phlomis in containers in this article.
GROWING PHLOMIS IN CONTAINERS
As Phlomis has a quick-growing root system, you will need to choose a very large container as possible- a deep half barrel will be ideal.
First, choose a container that has plenty of drainage holes at the bottom. Fill this container with a 2cm layer of gravel to aid drainage even further. On top of this add multipurpose compost to within 5cm of the top rim of the container.

Dig a hole at the centre of the container slightly bigger than the root ball it came in the original container you purchase it in. Place the plant in so that the top of the root ball is at the same level as the top surface 0f the compost in the container. Backfill with the growing media ensuring that no vacant spaces remain, using more compost if you deem it to be necessary. Firm the shrub in and water very well.
THE BEST GROWING CONDITIONS
The container must be placed where it gets full sun but be sheltered from hard frosts, cold winds and hard winter rains.
You will need to water frequently until it is established and especially when 5cm below the top surface of the container feels dry to the touch. After that, it will only need to be watered when 5cm below the top surface of the compost feels dry to the touch. It is important that it is not overwatered at all.
As it can be a rampant plant, it is not recommended to feed too generously. Only feed in early spring with a general-purpose, slow-release fertilizer at half its recommended dosage. Be light-handed and not too heavy as you will get an unruly plant that does not look too good.
To prune in early spring, you can remove all frost-damaged stems and about one-third of all old stems. This will also keep the plant in check.
To propagate you can either do this via softwood cuttings taken in summer and grown in a cold frame or alternatively via seeds planted in spring.
GROWING FROM SEED

To do this fill a seed tray with seed compost and water it well. Sow the seeds thinly on top and sprinkle a fine dusting of sieved seed compost on top. Firm the compost gently and place a propagator lid on top and wait for the seeds to germinate. In a short time, the seeds will germinate and once big enough to handle you can prick them out and transplant them to a 10cm diameter pot full of multipurpose compost. Allow them to grow on and when they are big enough you can harden them off before planting them outside once the final frosts have passed.
You will need to divide your Phlomis every few years to make sure that it looks good and to keep the growth in check. All you need to do is take the shrub out of the container and divide it into 2 to 4 divisions. Each division can then be planted in its own containers.
PESTS AND DISEASES
They, in general, do not suffer from diseases but in severe cold and wet winters they may be killed. To prevent this, you can either move it under the protection of a greenhouse or place it where it is away from the rain.
In terms of pests, leaf hoppers can be a problem although they cause little damage.
VARIETIES TO GROW

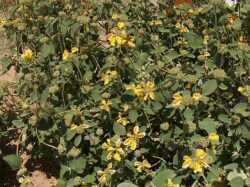
There are 4 species that can be grown in the UK. This includes the hardiest species Phlomis fruticosa which grows up to 1m tall. It produces deep yellow flowers above grey-green leaves in June and July. A noted variety is ‘Edward Dante’ which produces sulphur-yellow flowers, where it grows up to 1.5m tall and flowers between August and September.
The other species that you can find is Phlomis russeliana (Turkish Sage) which produces soft, hooded, yellow flowers over large, ovate, rough-textured, grey-green leaves.
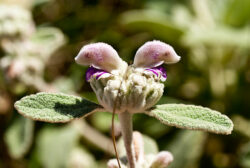
The remaining species are Phlomis chrysophylla, which is similar to P. fruticosa but the leaves are soft grey and take distinct yellow texture blooms and Phlomis italica which only grows up to 60cm high. It is totally different from the other Phlomis, where pale lilac flowers are borne in terminal spikes in summer.
CONCLUSIONS
In this article, we have discovered how to grow the beautiful Phlomis in containers. They are easy to care for and easy to look after, and they can bring many months of flowers into the container garden.
They are such a delight, so why not grow some today? If you have any questions or comments that you wish to remain growing Phlomis in containers, please do so in the comment box below.
Happy Phlomis growing.
